Create the EPM Repositories for a Sandbox with SQL Server

Disclaimer
Click the images in the article below to toggle between thumbnail and full-size. Enlarge all | Reduce all
Introduction
This article shows how to create the repositories needed for an Oracle Hyperion EPM sandbox for Planning, using scripts that can be run from the command line in SQL Server Management Studio.
Having your own EPM sandbox is very valuable, because it gives you a great place to learn about new features and run experiments to see how things work. Jake Turrell has an excellent series of blog posts showing how to create a sandbox using Oracle DB for the repositories. Here's a link to Jake's blog: Jake Turrell’s “EPM Adventures”.
If you want to create a sandbox using SQL Server instead of Oracle DB for the repositories, this article is for you. Just follow Jake's blog to the point where he installs Oracle RDBMS, then use this article to create the repositories in SQL Server (assuming you've already installed SQL Server), and then return to Jake's blog after the point where he creates the repositories. There will be some differences during the step in Jake's blog where you configure Hyperion Planning because you're using SQL Server instead of Oracle DB, but the process and most of the details will be the same. One difference, for example, is that instead of the Oracle driver, you will select the SQL Server driver as the Database Type on the screen headed "Set up Shared Services and Registry Database Connection associated with the database instance home."
While it is possible to create everything needed for an EPM repository using the GUI tools of SQL Server Management Studio, this article instead uses SQL scripts that can be run from a query window. This is preferred because when you need to create multiple objects, such as Logins and Databases, it is faster and less likely that there will be mistakes if you're working with a scripted template that can quickly be prepared in a text editor than if you're going through a multitude of screens in Management Studio.
SQL Server Properties
The first thing to address are SQL Server database properties that are needed to support Oracle Hyperion EPM. They are discussed in the Oracle documentation here: Microsoft SQL Server Database Creation Requirements.
The table below summarizes the properties that are needed and how they can be set.
| Property | Setting | Description |
| READ_COMMITTED_SNAPSHOT | ON | Set at DB level using a SQL command |
| ALLOW_SNAPSHOT_ISOLATION | ON | Set at DB level using a SQL command |
| Authentication Mode | SQL Server and Windows Authentication mode | Set at server level only, during install or using Mgmt Studio post-install. |
| Server Collation | Latin and Case Insensitive | Set at server level during install. Difficult to change at server level post-install. Can be set at DB level using Mgmt Studio. |
The first two properties pertain to database transaction isolation levels. They cannot be set at the server level, only at the database level. These properties are not updatable through Management Studio. To set them, you must run the SQL statements below. Don't run them yet. They will be part of the complete SQL script that is presented later in the article.
ALTER DATABASE [dbName] SET ALLOW_SNAPSHOT_ISOLATION ON
ALTER DATABASE [dbName] SET READ_COMMITTED_SNAPSHOT ON
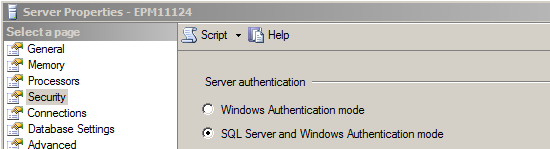
The third property is authentication mode. This is an option that is set during SQL Server installation, and it can be modified post-installation through Management Studio. You can see the current setting in Management Studio by right-clicking the server, clicking Properties, and then selecting the Security page. On the Security page, under Server authentication, you can see which server authentication mode is selected.
To use this database as an EPM repository, SQL Server must use "SQL Server and Windows Authentication mode". If "Windows Authentication mode" is being used and you want to change it so it will support an Oracle Hyperion EPM implementation, select the radio button for "SQL Server and Windows Authentication mode" and click OK. In the pop-up dialog box, click OK to restart SQL Server.
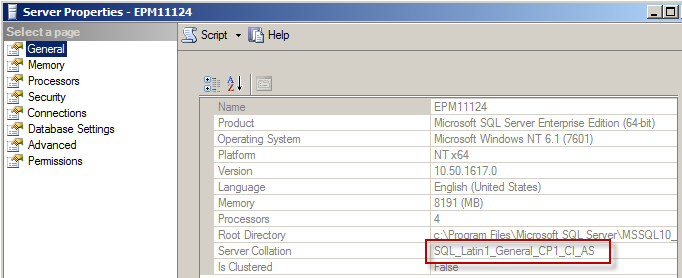
The fourth property is Server Collation. You can see your server's collation in SQL Server Management Studio by right-clicking the server, clicking Properties, and then selecting the General page.
Oracle EPM products require Latin collation and case insensitivity. The collation suggested in the Oracle documentation is "SQL_Latin1_General_CP1_CI_AS". This is obviously a Latin collation, and you can tell that it is case insensitive because it contains the string "_CI_". The collation defined at the server level will be inherited by default when you create a database, so if your server's collation is Latin and case insensitive you will not need to take any action for your new databases to have an acceptable collation.
If the server collation is not Latin or not case insensitive, you can either 1) change the server collation property or 2) specify the collation at the database level. Changing the server collation property is a complex undertaking as shown in this link: Set or Change the Server Collation.
Because of the complexity of changing the server-level collation, and also because you may not have the option to change it if another application running on that SQL Server instance needs the other collation, it's easier and safer to take the second option and set the needed collation at the database level when you create the databases for your repositories.
Here is a link to Microsoft's documentation on the topic of changing a database collation property: Set or Change the Database Collation. Be sure to read the section called "Before You Begin", which spells out limitations and restrictions.
The collation can be set at the database level using either Management Studio or a SQL script. Since it's safest if there are no tables in the database when this is done, it is best practice to incorporate the SQL into the script that creates the database. The "COLLATE" statement shown below will set the database collation. Don't try to run it now. It is incorporated into the full script that creates the databases in a later section of this article.
COLLATE SQL_Latin1_General_CP1_CI_AS
Planning for the Repositories
For this article, my plan is to create the repositories needed for a sandbox that supports Planning. Not all of the EPM applications needed in a Planning environment require a repository. For example, Essbase needs to be installed in a Planning environment, but it doesn't need its own repository. The table below summarizes the repositories needed for our Planning sandbox.
| DB Name | EPM App | Login | Password |
| SS | Shared Services | SS_user | SS_pwd |
| EPMA | Enterprise Performance Management Architect | EPMA_user | EPMA_pwd |
| EAS | Essbase Administration Services | EAS_user | EAS_pwd |
| PLANSYS | Planning System Repository | PLANSYS_user | PLANSYS_pwd |
| PLANAPP1 | Planning Application Repository | PLANAPP1_user | PLANAPP1_pwd |
| CALC | Calculation Manager | CALC_user | CALC_pwd |
| BIPLUS | Financial Reporting and Web Analysis | BIPLUS_user | BIPLUS_pwd |
By way of clarification, the "PLANSYS" database is intended for use as the repository for the overall Planning product. The "PLANAPP1" database is the repository for a Planning app, e.g., the sample Vision app that ships with the Planning product.
Sizing the Repositories
How big should the databases that house our repositories be? Here is a link to Oracle's documentation about recommended SQL Server database sizes in a production environment: Microsoft SQL Server Sizing Guidelines
Since we are building a sandbox, we can tailor the database sizes to our needs. As a starting point, I have defined the datafile sizes per Oracle's recommendations and the logfile sizes as 10MB across the board. If I find that I don't need this much space after I've used the sandbox for a while, I can reduce the size to recover space on my hard drive. Here's a link to my article that shows how to reduce the size of a SQL Server database: Reduce SQL Server Database Size.
The following table shows the sizes we will use for our repositories.
| DB Name | Datafile Size | Logfile Size |
|---|---|---|
| SS | 100 MB | 10 MB |
| EPMA | 250 MB |
10 MB |
| EAS | 32 MB |
10 MB |
| PLANSYS | 100 MB |
10 MB |
| PLANAPP1 | 250 MB |
10 MB |
| CALC | 100 MB |
10 MB |
| BIPLUS | 250 MB |
10 MB |
SQL Script for a Single Database
Later, I'll show the complete script that will create all seven of the databases we'll want for our Planning sandbox, but for now let's just look at one of them to see what it does. Below is a SQL script that will create the SS database that we'll use to store the Shared Services repository.
/* Create SS Repository */
CREATE LOGIN [SS_user] WITH PASSWORD='SS_pwd',
    DEFAULT_DATABASE=[master],
    DEFAULT_LANGUAGE=[us_english],
    CHECK_EXPIRATION=OFF,
    CHECK_POLICY=OFF
GO

EXEC sys.sp_addsrvrolemember @loginame = 'SS_user', @rolename = 'sysadmin'
GO

ALTER LOGIN [SS_user] ENABLE
GO

EXECUTE AS LOGIN = 'SS_user'
GO

CREATE DATABASE [SS]
ON  PRIMARY
( NAME = 'SS',
FILENAME = 'C:\Program Files\Microsoft SQL Server\MSSQL10_50.MSSQLSERVER\MSSQL\DATA\SS.mdf' ,
SIZE = 100MB , MAXSIZE = UNLIMITED, FILEGROWTH = 10%)
 LOG ON
( NAME = 'SS_log',
FILENAME = N'C:\Program Files\Microsoft SQL Server\MSSQL10_50.MSSQLSERVER\MSSQL\DATA\SS_log.ldf' ,
SIZE = 10MB , MAXSIZE = UNLIMITED, FILEGROWTH = 10%)
COLLATE SQL_Latin1_General_CP1_CI_AS
GO

ALTER DATABASE [SS] SET READ_COMMITTED_SNAPSHOT ON
ALTER DATABASE [SS] SET ALLOW_SNAPSHOT_ISOLATION ON

GO
The script above 1) creates a new LOGIN; 2) gives the new LOGIN the sysadmin role; 3) enables the new LOGIN; 4) changes the connection used from this point on in the script to the new LOGIN; 5) creates a new database; and 6) sets the transaction isolation level for the new database.
I don't recommend using the password shown here. It is for demonstration purposes only. You should use a more secure password, even in your sandbox environment.
The paths shown for the data file and the log file may not be correct on your server. Adjust them as needed to point to the folder where your files are located.
I have set the data and log files to automatically grow by 10% of their initial size when they fill, and to continue to grow without limit. This means that I don't have to worry about the system failing because a process is adding rows to a table and its database needs more space, but SQL Server won't provide it because the database has maxed out. But it does mean that I need to worry about a rogue process going into a loop and consuming all of the space on my hard drive. You may want to restrict growth, in which case you don't have the second concern but you do have the first. It's up to you to decide which risk you prefer in your sandbox.
Note that we have set the database collation in the script. If the server collation has been set to a Latin case insensitive value, this is an unneeded step.
The Complete Script
The complete script that creates all seven of the repositories simply consists of the above script copied seven times with the LOGIN names, PASSWORDs, and DATABASE names changed appropriately in each iteration as seen in the following.
/* Create SS Repository */
CREATE LOGIN [SS_user] WITH PASSWORD='SS_pwd',
    DEFAULT_DATABASE=[master],
    DEFAULT_LANGUAGE=[us_english],
    CHECK_EXPIRATION=OFF,
    CHECK_POLICY=OFF
GO

EXEC sys.sp_addsrvrolemember @loginame = 'SS_user', @rolename = 'sysadmin'
GO

ALTER LOGIN [SS_user] ENABLE
GO

EXECUTE AS LOGIN = 'SS_user'
GO

CREATE DATABASE [SS]
ON  PRIMARY
( NAME = 'SS',
FILENAME = 'C:\Program Files\Microsoft SQL Server\MSSQL10_50.MSSQLSERVER\MSSQL\DATA\SS.mdf' ,
SIZE = 100MB , MAXSIZE = UNLIMITED, FILEGROWTH = 10%)
 LOG ON
( NAME = 'SS_log',
FILENAME = N'C:\Program Files\Microsoft SQL Server\MSSQL10_50.MSSQLSERVER\MSSQL\DATA\SS_log.ldf' ,
SIZE = 10MB , MAXSIZE = UNLIMITED, FILEGROWTH = 10%)
COLLATE SQL_Latin1_General_CP1_CI_AS
GO

ALTER DATABASE [SS] SET READ_COMMITTED_SNAPSHOT ON
ALTER DATABASE [SS] SET ALLOW_SNAPSHOT_ISOLATION ON

GO

/* Create EPMA Repository */
CREATE LOGIN [EPMA_user] WITH PASSWORD='EPMA_pwd',
    DEFAULT_DATABASE=[master],
    DEFAULT_LANGUAGE=[us_english],
    CHECK_EXPIRATION=OFF,
    CHECK_POLICY=OFF
GO

EXEC sys.sp_addsrvrolemember @loginame = 'EPMA_user', @rolename = 'sysadmin'
GO

ALTER LOGIN [EPMA_user] ENABLE
GO

EXECUTE AS LOGIN = 'EPMA_user'
GO

CREATE DATABASE [EPMA]
ON  PRIMARY
( NAME = 'EPMA',
FILENAME = 'C:\Program Files\Microsoft SQL Server\MSSQL10_50.MSSQLSERVER\MSSQL\DATA\EPMA.mdf' ,
SIZE = 200MB , MAXSIZE = UNLIMITED, FILEGROWTH = 10%)
 LOG ON
( NAME = 'EPMA_log',
FILENAME = N'C:\Program Files\Microsoft SQL Server\MSSQL10_50.MSSQLSERVER\MSSQL\DATA\EPMA_log.ldf' ,
SIZE = 20MB , MAXSIZE = UNLIMITED, FILEGROWTH = 10%)
COLLATE SQL_Latin1_General_CP1_CI_AS
GO

ALTER DATABASE [EPMA] SET READ_COMMITTED_SNAPSHOT ON
ALTER DATABASE [EPMA] SET ALLOW_SNAPSHOT_ISOLATION ON

GO

/* Create EAS Repository */
CREATE LOGIN [EAS_user] WITH PASSWORD='EAS_pwd',
    DEFAULT_DATABASE=[master],
    DEFAULT_LANGUAGE=[us_english],
    CHECK_EXPIRATION=OFF,
    CHECK_POLICY=OFF
GO

EXEC sys.sp_addsrvrolemember @loginame = 'EAS_user', @rolename = 'sysadmin'
GO

ALTER LOGIN [EAS_user] ENABLE
GO

EXECUTE AS LOGIN = 'EAS_user'
GO

CREATE DATABASE [EAS]
ON  PRIMARY
( NAME = 'EAS',
FILENAME = 'C:\Program Files\Microsoft SQL Server\MSSQL10_50.MSSQLSERVER\MSSQL\DATA\EAS.mdf' ,
SIZE = 200MB , MAXSIZE = UNLIMITED, FILEGROWTH = 10%)
 LOG ON
( NAME = 'EAS_log',
FILENAME = N'C:\Program Files\Microsoft SQL Server\MSSQL10_50.MSSQLSERVER\MSSQL\DATA\EAS_log.ldf' ,
SIZE = 20MB , MAXSIZE = UNLIMITED, FILEGROWTH = 10%)
COLLATE SQL_Latin1_General_CP1_CI_AS
GO

ALTER DATABASE [EAS] SET READ_COMMITTED_SNAPSHOT ON
ALTER DATABASE [EAS] SET ALLOW_SNAPSHOT_ISOLATION ON

GO

/* Create PLANSYS Repository */
CREATE LOGIN [PLANSYS_user] WITH PASSWORD='PLANSYS_pwd',
    DEFAULT_DATABASE=[master],
    DEFAULT_LANGUAGE=[us_english],
    CHECK_EXPIRATION=OFF,
    CHECK_POLICY=OFF
GO

EXEC sys.sp_addsrvrolemember @loginame = 'PLANSYS_user', @rolename = 'sysadmin'
GO

ALTER LOGIN [PLANSYS_user] ENABLE
GO

EXECUTE AS LOGIN = 'PLANSYS_user'
GO

CREATE DATABASE [PLANSYS]
ON  PRIMARY
( NAME = 'PLANSYS',
FILENAME = 'C:\Program Files\Microsoft SQL Server\MSSQL10_50.MSSQLSERVER\MSSQL\DATA\PLANSYS.mdf' ,
SIZE = 200MB , MAXSIZE = UNLIMITED, FILEGROWTH = 10%)
 LOG ON
( NAME = 'PLANSYS_log',
FILENAME = N'C:\Program Files\Microsoft SQL Server\MSSQL10_50.MSSQLSERVER\MSSQL\DATA\PLANSYS_log.ldf' ,
SIZE = 20MB , MAXSIZE = UNLIMITED, FILEGROWTH = 10%)
COLLATE SQL_Latin1_General_CP1_CI_AS
GO

ALTER DATABASE [PLANSYS] SET READ_COMMITTED_SNAPSHOT ON
ALTER DATABASE [PLANSYS] SET ALLOW_SNAPSHOT_ISOLATION ON

GO

/* Create PLANAPP1 Repository */
CREATE LOGIN [PLANAPP1_user] WITH PASSWORD='PLANAPP1_pwd',
    DEFAULT_DATABASE=[master],
    DEFAULT_LANGUAGE=[us_english],
    CHECK_EXPIRATION=OFF,
    CHECK_POLICY=OFF
GO

EXEC sys.sp_addsrvrolemember @loginame = 'PLANAPP1_user', @rolename = 'sysadmin'
GO

ALTER LOGIN [PLANAPP1_user] ENABLE
GO

EXECUTE AS LOGIN = 'PLANAPP1_user'
GO

CREATE DATABASE [PLANAPP1]
ON  PRIMARY
( NAME = 'PLANAPP1',
FILENAME = 'C:\Program Files\Microsoft SQL Server\MSSQL10_50.MSSQLSERVER\MSSQL\DATA\PLANAPP1.mdf' ,
SIZE = 200MB , MAXSIZE = UNLIMITED, FILEGROWTH = 10%)
 LOG ON
( NAME = 'PLANAPP1_log',
FILENAME = N'C:\Program Files\Microsoft SQL Server\MSSQL10_50.MSSQLSERVER\MSSQL\DATA\PLANAPP1_log.ldf' ,
SIZE = 20MB , MAXSIZE = UNLIMITED, FILEGROWTH = 10%)
COLLATE SQL_Latin1_General_CP1_CI_AS
GO

ALTER DATABASE [PLANAPP1] SET READ_COMMITTED_SNAPSHOT ON
ALTER DATABASE [PLANAPP1] SET ALLOW_SNAPSHOT_ISOLATION ON

GO

/* Create CALC Repository */
CREATE LOGIN [CALC_user] WITH PASSWORD='CALC_pwd',
    DEFAULT_DATABASE=[master],
    DEFAULT_LANGUAGE=[us_english],
    CHECK_EXPIRATION=OFF,
    CHECK_POLICY=OFF
GO

EXEC sys.sp_addsrvrolemember @loginame = 'CALC_user', @rolename = 'sysadmin'
GO

ALTER LOGIN [CALC_user] ENABLE
GO

EXECUTE AS LOGIN = 'CALC_user'
GO

CREATE DATABASE [CALC]
ON  PRIMARY
( NAME = 'CALC',
FILENAME = 'C:\Program Files\Microsoft SQL Server\MSSQL10_50.MSSQLSERVER\MSSQL\DATA\CALC.mdf' ,
SIZE = 200MB , MAXSIZE = UNLIMITED, FILEGROWTH = 10%)
 LOG ON
( NAME = 'CALC_log',
FILENAME = N'C:\Program Files\Microsoft SQL Server\MSSQL10_50.MSSQLSERVER\MSSQL\DATA\CALC_log.ldf' ,
SIZE = 20MB , MAXSIZE = UNLIMITED, FILEGROWTH = 10%)
COLLATE SQL_Latin1_General_CP1_CI_AS
GO

ALTER DATABASE [CALC] SET READ_COMMITTED_SNAPSHOT ON
ALTER DATABASE [CALC] SET ALLOW_SNAPSHOT_ISOLATION ON

GO

/* Create BIPLUS Repository */
CREATE LOGIN [BIPLUS_user] WITH PASSWORD='BIPLUS_pwd',
    DEFAULT_DATABASE=[master],
    DEFAULT_LANGUAGE=[us_english],
    CHECK_EXPIRATION=OFF,
    CHECK_POLICY=OFF
GO

EXEC sys.sp_addsrvrolemember @loginame = 'BIPLUS_user', @rolename = 'sysadmin'
GO

ALTER LOGIN [BIPLUS_user] ENABLE
GO

EXECUTE AS LOGIN = 'BIPLUS_user'
GO

CREATE DATABASE [BIPLUS]
ON  PRIMARY
( NAME = 'BIPLUS',
FILENAME = 'C:\Program Files\Microsoft SQL Server\MSSQL10_50.MSSQLSERVER\MSSQL\DATA\BIPLUS.mdf' ,
SIZE = 200MB , MAXSIZE = UNLIMITED, FILEGROWTH = 10%)
 LOG ON
( NAME = 'BIPLUS_log',
FILENAME = N'C:\Program Files\Microsoft SQL Server\MSSQL10_50.MSSQLSERVER\MSSQL\DATA\BIPLUS_log.ldf' ,
SIZE = 20MB , MAXSIZE = UNLIMITED, FILEGROWTH = 10%)
COLLATE SQL_Latin1_General_CP1_CI_AS
GO

ALTER DATABASE [BIPLUS] SET READ_COMMITTED_SNAPSHOT ON
ALTER DATABASE [BIPLUS] SET ALLOW_SNAPSHOT_ISOLATION ON

GO
This script can be run from a query window in Management Studio. Be sure to connect with a login that has the sysadmin role.
Reviewing the Logins and Databases
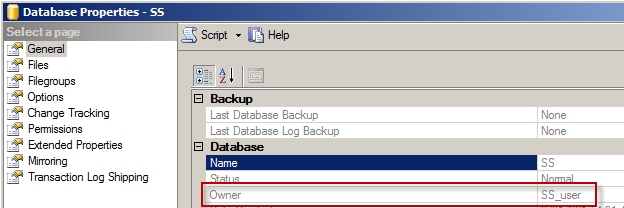
Let's review what we've just created. Rather than looking at all seven of the repositories, let's just look at the SS repository. We should find an SS database that is owned by the login named SS_user.
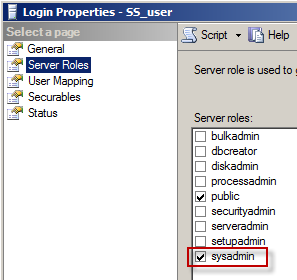
We should find that the SS_user login has the sysadmin role.

And finally, we should find that the login is mapped to the SS database.
Final Remarks
Using the script above lets you create all seven of the repositories from the command line of a query window, which is more efficient and less error prone than going through the UI.
For a step-by-step guide to installing SQL Server with default settings for authentication mode and server collation that are appropriate for Orable Hyperion EPM repositories, see my article: Install SQL Server for Use with Hyperion EPM
If you have any questions about this article or would like to discuss a consulting engagement, please email me at my G-mail account, which has a userid of "tcockerline".
-Tom Cockerline, February 2017